What is a Screaming Frog Crawl Schedule?
A Screaming Frog crawl schedule allows you to automate the process of crawling a website or a set of links and set intervals.
Why is Scheduling a Screaming Frog Crawl Useful?
Scheduled Crawls assist us in monitoring the health of the site by;
- Regularly identifying and addressing technical SEO issues.
- Checking that new and updated content is promptly indexed.
- Monitoring any changes in website structure and much more
Steps to schedule a Screaming Frog Crawl
Step 1: Configure Your Crawl Settings
We begin by setting up a configuration in screaming frog which has all of the settings selected that we need in order to produce the data we need to see.
We recommend having the following settings selected for your scheduling your crawl which should be satisfactory for comprehensive crawl data for most websites:
Configuration > Spider Settings > Crawl > Crawl Behaviour
- Tick “Crawl All Subdomains”
- Tick Follow Internal “nofollow”.
- Tick “Follow External “nofollow”
Configuration > Spider Settings > Crawl > XML Sitemaps
- Tick “Crawl Linked XML Sitemaps.”
- Tick “Auto Discover XML Sitemaps via robots.txt”
- Tick “Crawl These Sitemaps.”
Configuration > Spider Settings > Rendering:
- Depending on how the site is designed, render with “Text Only” or if the website has a heavy reliance on JavaScript render with “JavaScript” but only use this if necessary as it will severely slow down the crawl.
Configuration > Spider Settings > Crawl > Extraction > Structured Data
- Tick “Schema org Validation”
- Tick “Google Rich Results Feature Validation.”
Configuration > Spider Settings > Crawl > Advanced
- Untick “Respect Noindex”
- Untick “Respect Canonicals”
- Untick “Respect next/prev”
Configuration > Spider Settings > Content > Duplicates Settings:
- Untick “Only Check Indexable Pages for Duplicates.”
Configuration > Spider Settings > Content > Spelling & Grammar Settings:
- Tick “Enable Spell Check”
- Tick “Enable Grammar Check”
- Select “Manual”
- Change the drop-down to your desired region e.g. “English (Australia)”
Configuration > Spider Settings > Robots.txt
- The default setting here is: “Respect robots.txt”, change to “Ignore robots.txt but report status”
Configuration > Spider Settings > API Access > Google Search Console:
- Search Analytics Tab > “Change Date Range to Past 12 Months” and Tick “Crawl new URLs Discovered in Google Search Console”
- URL Inspection Tab > Tick “Enable URL Inspection” and “Use Multiple Properties”
Configuration > Spider Settings > Crawl Analysis:
- Tick “Auto-analyse at the End of Crawl”
Once we have this we will export the file and use that as a foundation for the scheduling.
Step 2: Schedule the Crawl
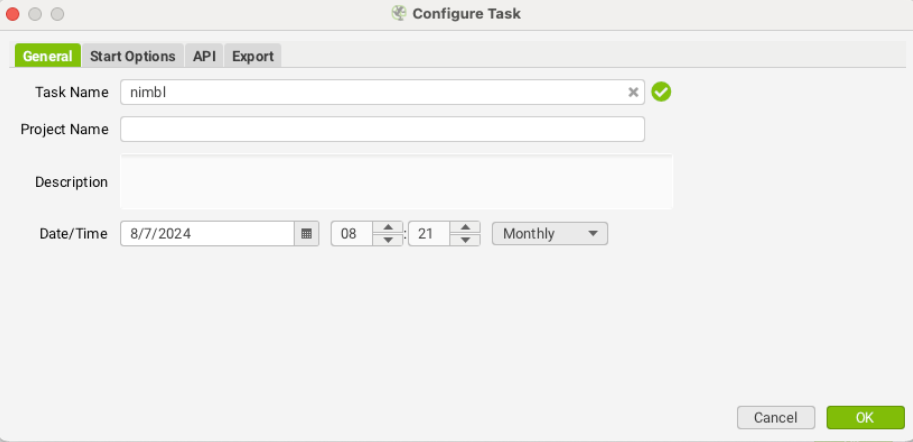
Next, go to ‘File > Scheduling > Add’
We now need to add in the applicable data. (Once you have set this up, you can just duplicate an existing setup to save time)
- Task Name: Assign a task name
- Date and Frequency: Set the date and crawl regularity (e.g. Daily, Weekly, Monthly)
Step 3: Define Start Options
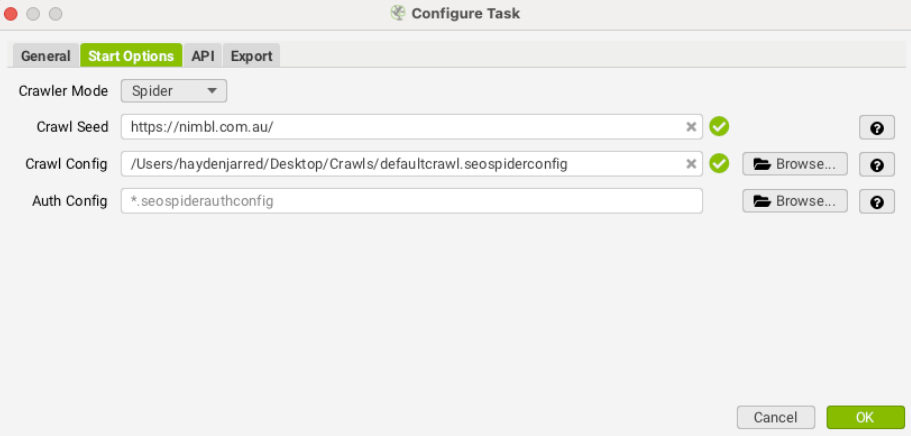
Under the ‘Start Options’ tab, configure the following:
Crawler Mode: Choose between two options:
- Spider: Crawls all links found on a single domain starting from one URL.
- List: Crawls a specific list of URLs.
Crawl Seed: If you choose Spider mode, input the root domain. For List mode, provide a CSV file with the URLs or a sitemap.
Crawl Config: Import the configuration file with your selected settings.
Step 4: Configure API Integrations
In the ‘API’ tab, set up the necessary APIs based on your goals:
- Google Universal Analytics
- Google Analytics 4
- Google Search Console (necessary for fetching indexing status of content)
- Page Speed Insights
- Majestic
- Moz
Step 5: Set Up Export Ooptions
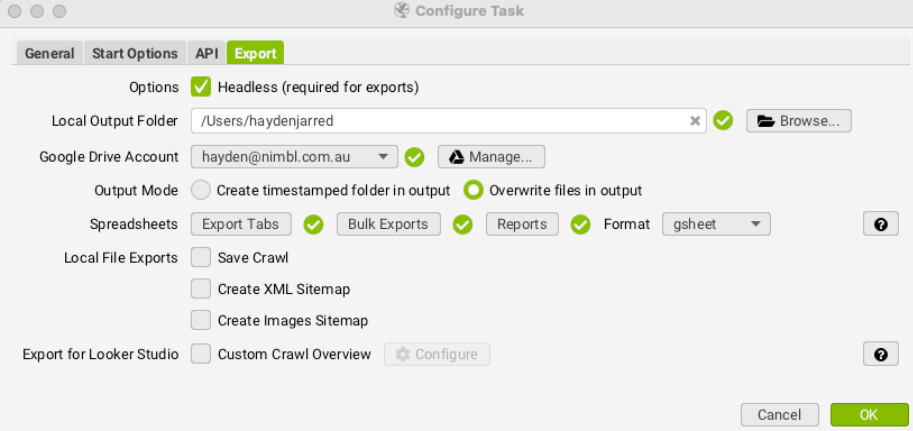
Under the ‘Export’ tab, configure the following settings:
- General Settings:
- Headless Mode: Meaning without an interface (Required for exports)
- Google Drive Account: Connect your Google Drive.
- Overwrite Files: Choose to overwrite existing files in the output.
- Output Format: Set the format to Google Sheets (gsheet).
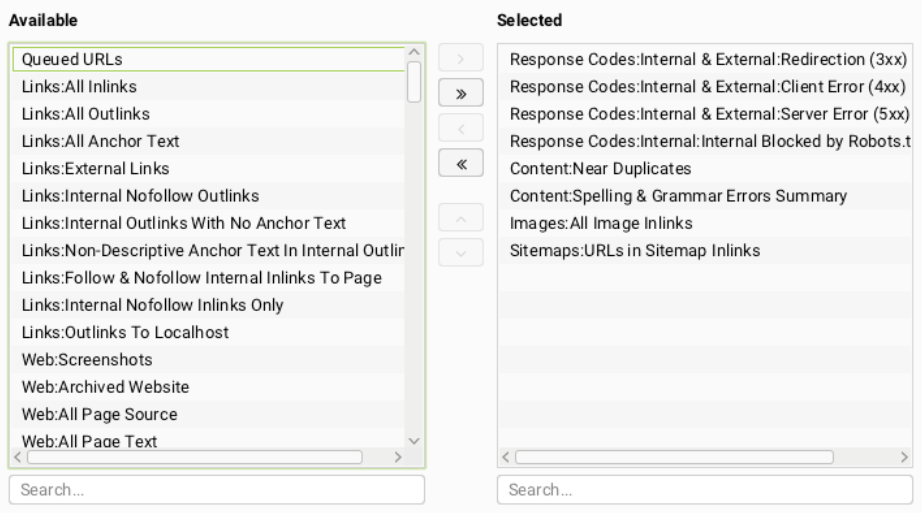
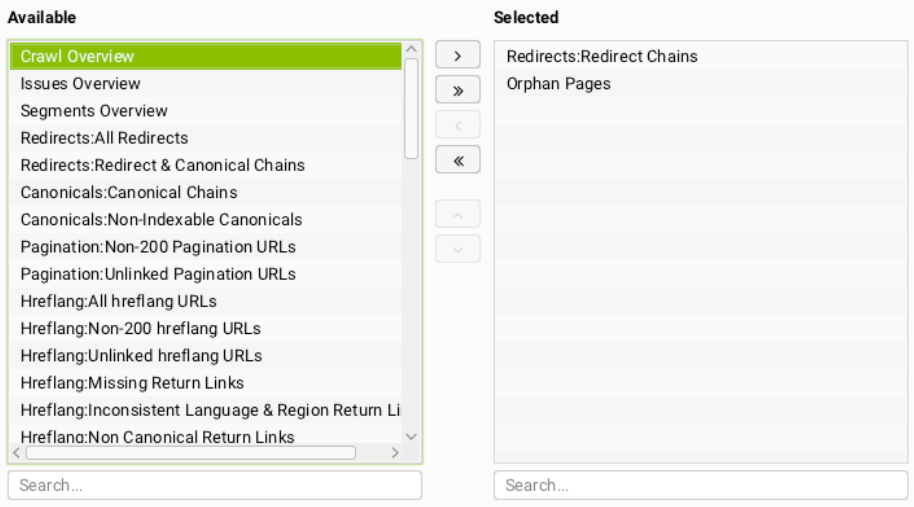
Then we want to select the Tabs, Exports and Reports we would like data on below are screenshots of the data we find most important for our Technical Audits;
Export Tabs
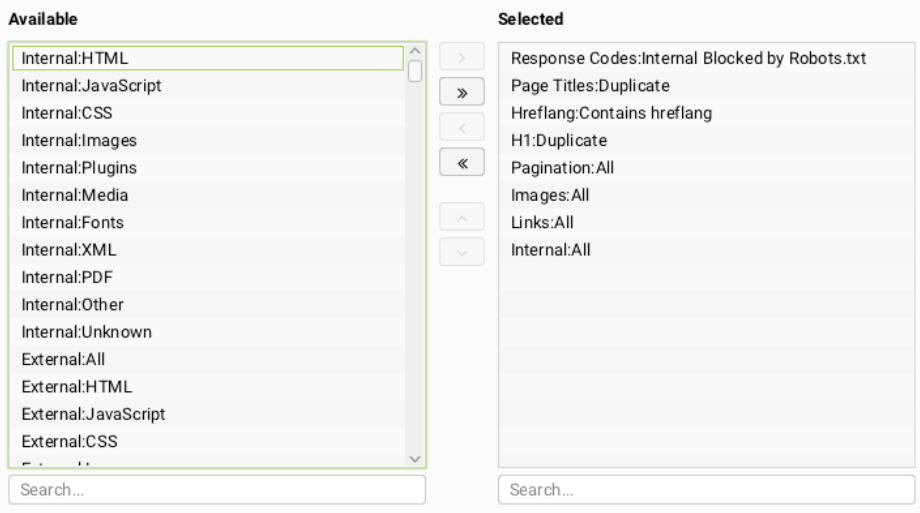
Bulk Exports
Reports
What To Do If A Scheduled Screaming Frog Crawl Fails?
Step 1: Identify The Crawling Issue
There are a number of reasons why a scheduled crawl may have failed but to identify the issue we can go to ‘File > Scheduling > History’, and here we will identify in the first column if the crawl was successful or not and in the error column we can see the issue.

Some common errors that may occur are
- Unexpected task shutdown detected: Unknown Application Crash
- Unexpected task shutdown detected: Out Of Memory
- Low Memory
- Licence expired
- Google Search Console failed to connect
- Google Drive Error: Read timed out
- Google Analytics 4 failed to connect
Step 2: How To Fix A Scheduled Crawl Issue?
Once we have identified the error there are several ways we can go about resolving the issue. Here are how we fix two common problems;
API Connection Error
An API connection error is when Screaming Frog is unable to successfully connect to one of the external service’s API, this can happen for a number of reasons but begin by going through the following troubleshooting steps;
Troubleshooting Steps:
- Step 1: Reconnect the API
- Navigate to the API configuration settings and reconnect the API.
- Navigate to the API configuration settings and reconnect the API.
- Step 2: Review Access
- Check with the platform to see if you still have access to the source of the data you are trying to incorporate into Screaming Frog.
- Check with the platform to see if you still have access to the source of the data you are trying to incorporate into Screaming Frog.
- Step 3: Review API Quotas
- Review the API’s usage limits and see if you have reached a quota or run out of credits
Low Memory Error
A low memory issue in Screaming Frog occurs when the tool runs out of available RAM while performing a crawl. This typically happens when crawling large sites or large amounts of data which can eventually cause the crawl to slow down, become unresponsive, or fail entirely.
Troubleshooting Steps:
- Step 1: Increase Allocated Memory
- Go to ‘Configuration > System > Memory Allocation’ and adjust the memory slider to a higher value but be careful as this may slow down your device.
- Go to ‘Configuration > System > Memory Allocation’ and adjust the memory slider to a higher value but be careful as this may slow down your device.
- Step 2: Reduce Crawl Scope
- Narrow down the crawl by excluding unnecessary sections of the site, such as large media files or less critical pages. You can do this by using the Include/Exclude options under Configuration > Spider to limit the URLs being crawled.
- Narrow down the crawl by excluding unnecessary sections of the site, such as large media files or less critical pages. You can do this by using the Include/Exclude options under Configuration > Spider to limit the URLs being crawled.
- Step 3: Upgrade Your Hardware
- If you frequently encounter memory issues, consider upgrading your system’s RAM or using a more powerful computer with higher memory capacity.
Scheduled Crawl Use Cases
Keeping on Top of Technical Errors
Regularly scheduled crawls help you stay ahead of technical SEO issues that could negatively impact your website’s performance in search engines. By automating crawls on a weekly or monthly basis, you can:
- Identify Broken Links: Automatically detect and fix broken internal and external links.
- Monitor Redirects: Keep an eye on redirects to ensure they are functioning properly.
- Check for 404 Errors: Quickly identify any 404 errors that should be fixed.
Understanding Indexing and Crawling Issues with Your Content
Scheduled crawls provide valuable insight into the current state of how Google is evaluating your website. This can for example help with the following:
- Monitor Crawlability: Ensure that important pages are crawlable and that no critical pages are mistakenly blocked or hidden.
- Track Indexation Issues: Detects pages that are not indexed, allowing you to take decisive action to fix these.
- Identify Orphan Pages: Identify pages that aren’t linked by any other pages on the site, limiting Google’s ability to discover these pages.
Monitoring Site Changes and Updates
Scheduled crawls are an excellent way to keep track of any change on your website over time. Allowing you to periodically compare states of the site for example:
- New Content: Monitor new pages are posts that are being added to a website.
- Track Site Redesigns: Check the impact of site redesigns or structural changes.
- Managing Seasonal Campaigns: Keep an eye on seasonal or temporary pages to ensure they are correctly indexed and removed when no longer needed.
Competitor Analysis
Though not as common, you can schedule crawls to monitor any changes on competitor websites:
- Track Competitor SEO Strategy: Review key SEO data from competitors’ sites to provide key insight into their SEO Strategy.
- Monitor Content Updates: Monitor new pages created by competitors to provide insight into their SEO Strategy.
Why We Like To Schedule Crawls For Our Clients
Crawling and Indexing are cornerstones to any successful SEO Strategy and if this is compromised, the visibility of your website will be limited on Google and therefore make it harder to reach the audience you are trying to get in front of.
By implementing scheduled crawls with tools such as Screaming Frog, we can get a better understanding of how Google sees our site and export data regularly to ensure that our website is optimised, properly accessible and technical issues are kept on top of. By following the structured steps outlined above, you’ll be well-equipped to maintain and improve your site’s SEO technical performance.
Do you need help with technical optimisations for your business? Contact us today to see how we can help your business take the next step in maximising its online presence.


